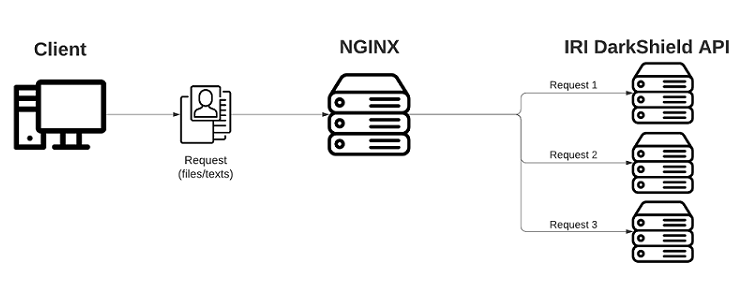
Load Balancing & Authenticating DarkShield via NGINX
This article demonstrates methods for balancing work loads and authenticating users of the IRI DarkShield API using free, easily deployed reverse proxy server software from NGINX.
Recall that DarkShield is a commercial IRI software product for multi-source data discovery and masking. It finds and masks PII in files, RDB and NoSQL DBs, documents, and images.
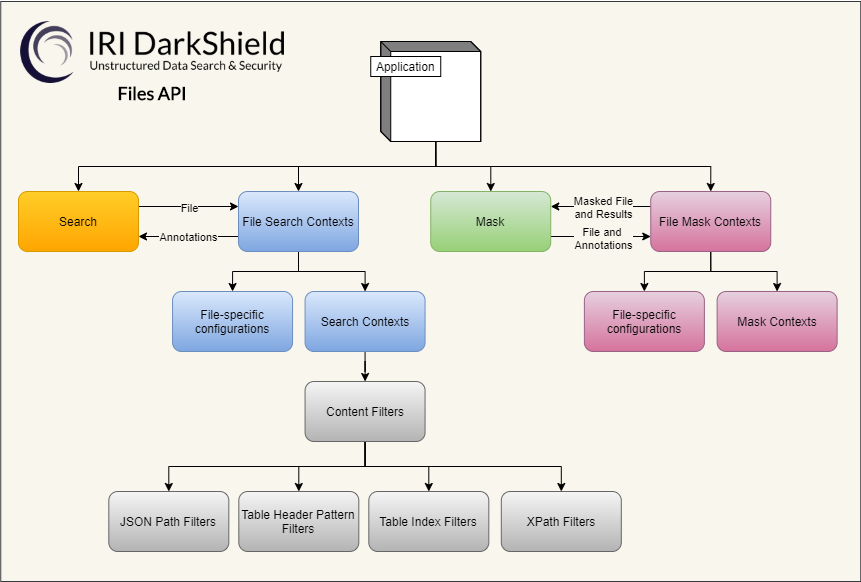
In addition to the IRI Workbench GUI for DarkShield built on Eclipse, IRI provides robust and flexible remote procedure call (RPC) APIs which are callable from a web service. This article covers the latter.
 NGINX is “open source software for web serving, reverse proxying, caching, load balancing, media streaming, and more”.
NGINX has two different versions of their product, Open Source and NGINX Plus (which you must pay for). Some features are hidden behind a paywall which I will make apparent in this article, but for the most part I use capabilities in the open source version.
A quick overview of the benefits of using NGINX with DarkShield are:
- Increased scalability and flexibility
- Single entry point for all clients
- Another level of security (sits between front end applications and micro services)
- More availability and performance
This article will focus on authentication and load balancing.
Before We Start
For testing authentication, requests will be sent to the DarkShield API with a key in the http header along with a JSON payload that contains an email address in the text that needs to be masked. I have three DarkShield API engine instances on one local computer running on ports 8080, 8081 and 8082.
To truly test load balancing, requests will send files of different sizes (MB) to three DarkShield API engine instances that are hosted on different computers. This will be explained in the Load Balancing section of this article.
I also want to be set up for error handling. Since NGINX is able to send its own error messages, I want to make sure that the IRI DarkShield API can still send its own error messages without interference.
To test this, the API that is on port 8082 does not have the search context for emails (which is code used to identify an email address in a text file to later be masked). The API on port 8082 should send its own error message stating that the EmailMatcherContext does not exist.
Basic Setup for NGINX
Once you download and install NGINX, find a file called nginx.conf in the conf folder. We will use this file as the starting point:
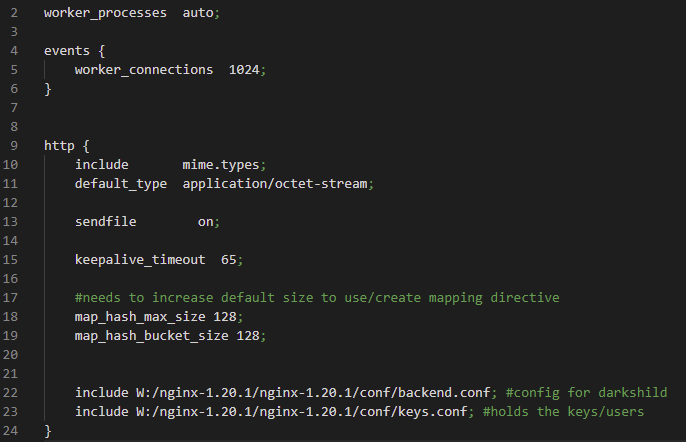
Note that I deleted the commits to make it easier to read and see the changes from the default. I also put a cheat sheet at the end of this article with the definitions to the directives used in NGINX.
Inside the http brackets is where changes are added to set everything up. I added the include directive at the bottom to make the backend.conf and the keys.conf visible to NGINX.
I made two config files: backend.conf and keys.conf which do not come with NGINX by default. The backend.conf file holds the information on how to reach the API, and the keys.conf holds the credentials of users.
![]()
NGINX can quickly process static sets of data like server names and map directive values because it uses (the smallest possible) hash tables. To authenticate users, the map directive is used to hold the keys and the client associated with that key. For this to work, change the default map_hash_value to 128 within the http brackets.

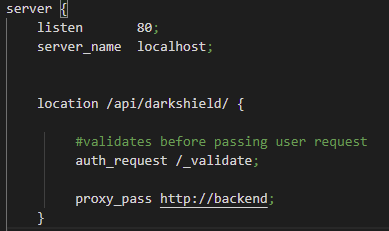
Now focusing on the backend.conf file, we’ll start with everything in the server bracket. NGINX by default is listening on port 80 and the server name is localhost. We will keep that the same and move to the location directive.
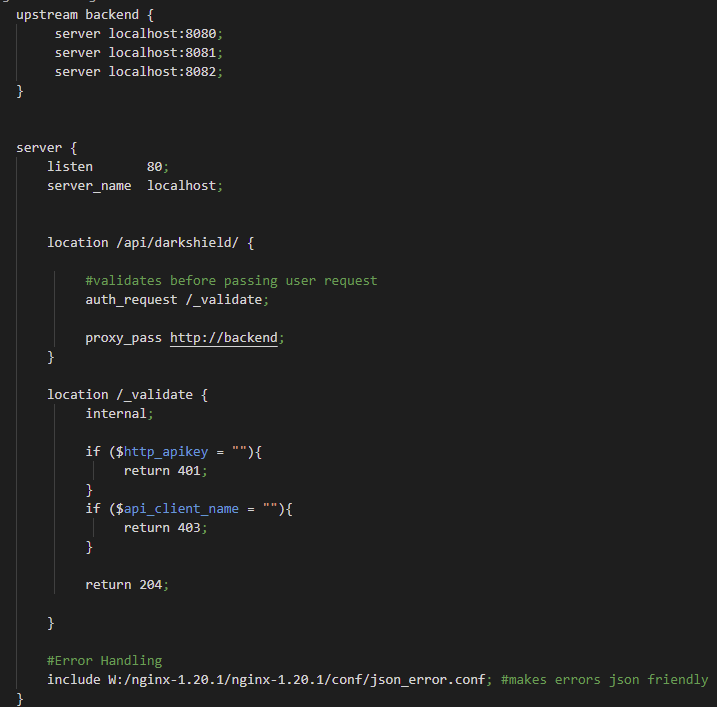
Here is my backend.conf file:
Reverse Proxy Directives
For NGINX to work as a reverse proxy it uses two directives: the location and the proxy_pass directive. The URI from the user request is used to match the location directives available.
If matching is not successful, you can put a return 403 error code as a catch-all. Matching can be very simple — like what is being used for the API location. Any requests that have /api/darkshield will match and be sent to the API.
You can make this more specific by using regular expressions which start with (~), or you can use (=) to ensure that the whole URI from the user matches exactly to the location directive.
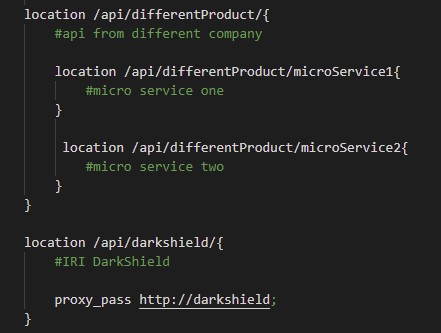
If you have API products from different companies using NGINX, you can speed up the matching process by having nested location directives. The outer location directive can match if the user is looking for the DarkShield API (masking engine), and the locations within the outer location can be the microservices.
Skipping over the auth_request directive, which will be explained in the Authentication section, we focus on the proxy_pass directive. If the request is approved by the authentication portion, the proxy_pass then sends the request to the upstream_directive which has the servers that host the API.
To pass the request to the servers, the name of the upstream directive must match the URL of the proxy_pass. For example, upstream is called darkshield {}, so for proxy_pass to send the request, it must use http://darkshield;.
Load Balancing
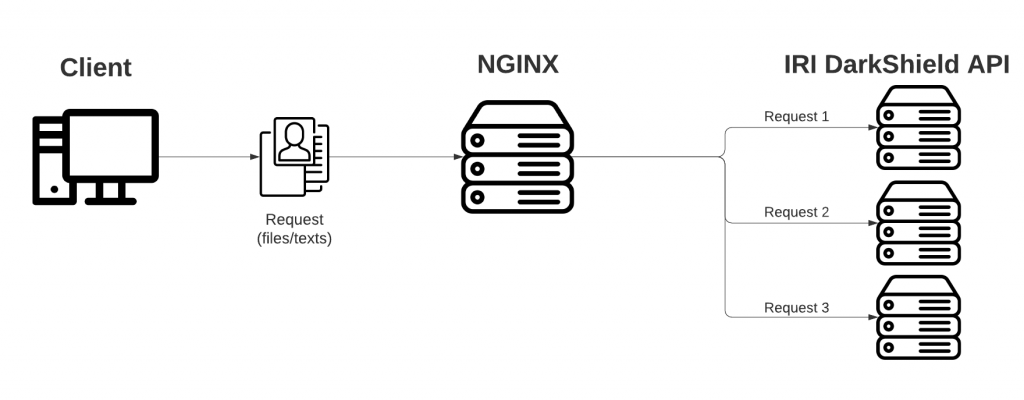
Now that NGINX is working as the reverse proxy server, we will shift our focus to how the upstream directive handles load balancing.
The upstream directive at the top of the backend.conf defines a group of servers which can listen on different ports. Scalability is easy due to this directive because adding or removing servers is handled only within this directive (nowhere else).

To add a server, all you need to do is use the server directive and the IP address followed by a colon (:) and the port number. Since all three of the DarkShield API instances are on my local machine, they all use localhost for the IP followed by the port number they are listening to.
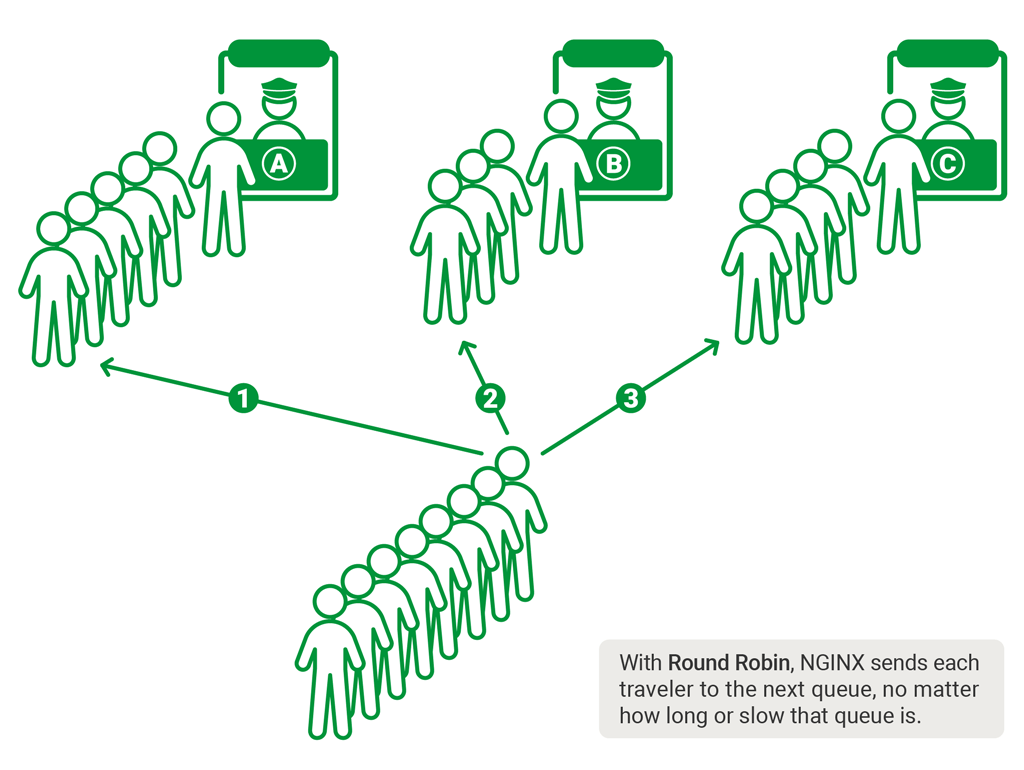
The default for how NGINX distributes the workload is in a weighted round-robin process, where each server gets the same amount of requests, meaning text/files that need to be searched and masked. You can control how many requests a specific server must complete before passing it to another server in the group.
This is handled by adding parameters next to the server. We will use the weight parameter. If we want the first server to handle five requests before passing the next request along, we will set the weight to five (server localhost:8080 weight=5;).
There are other parameters that you can use such as:
- backup – marks a server as backup to receive requests when primary servers are unavailable
- down – marks a server as permanently unavailable so it will not receive any requests
- max_fails – sets the number of unsuccessful attempts to communicate with the server; once the failure max is reached, it sets the server as unavailable for a certain duration
- Default is 1
- Configure downtime with fail_timeout
- slow_start – sets the time during which the server will recover its request weight from zero to its original value
These parameters give you greater control over the servers and how they deal with failure. For this demonstration, however, we won’t add any to keep it simple. There are also other processes that NGINX uses to distribute requests, including:
- Random
- Least Connections – a request is sent to a server with the fewest active connections
- IP Hash – uses the client IP address to distribute the request, ensuring that requests from the same client will always be passed to the same server if it is available
- Least time (only for NGINX Plus) – passes requests to the server with the shortest average response time and fewest active connections.
Again though, we used just the default options in our POC.
Load Balancing Benchmarks
To compare the performance gain of load balancing, we first use one DarkShield API node as a baseline for the performance of searching and masking jobs. When sending a request to a single node it is faster to send the request straight to the API, as this bypasses NGINX and is preferred for smaller jobs.
As for adding the other nodes, all requests were sent to the NGINX reverse proxy server so it could use load balancing to divide the workload among all the DarkShield APIs nodes in the server pool. All requests were sent asynchronously during testing.
Naturally, performance can be affected by two things: the processing power of the API host hardware; and, network capacity (speed/bandwidth) at job time.
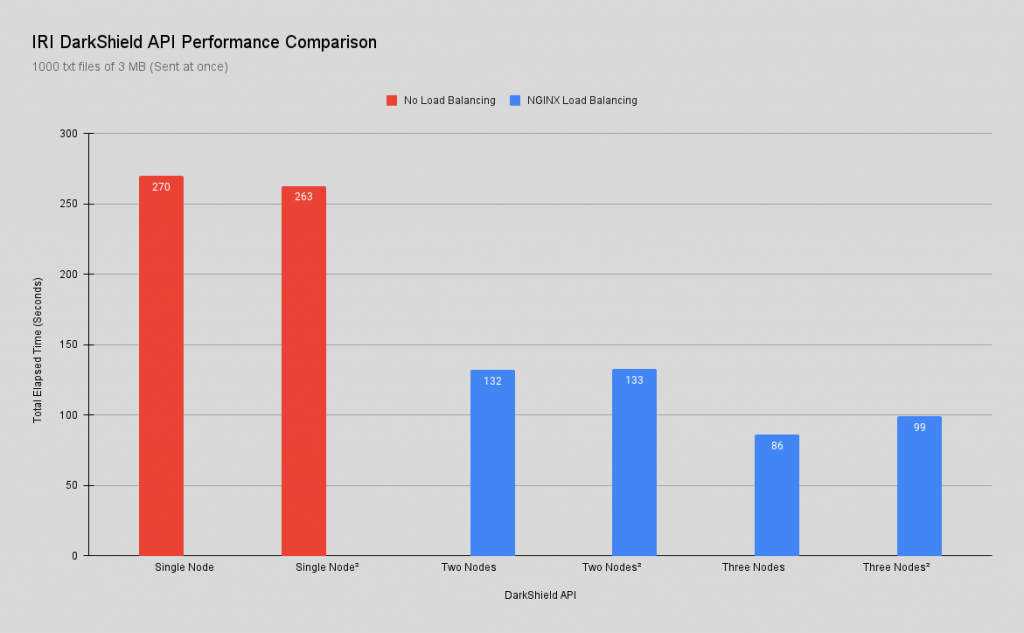
In the first test requests sent more than 1,000 3-MB text files at once for a total payload of 3 GB. The goal of this test was to see how a single API node deals with a large volume of requests and compare that performance to using load balancing with NGINX.
Once the baseline was established, another node was added to receive the same requests. With load balancing, the total elapsed time went from 4m:30s to 2m:12s. Just by adding a second node there was a 51% improvement in response time.
Adding a third node to the server pool dropped the total elapsed time to 1m:26. That is a further 35% performance improvement compared to using two nodes, and 68% faster than one node.
Of course there is a point of diminishing returns, so for these tests only three nodes were used. Note: To calculate the improvement, the formula used was: (new – old)/old * 100%
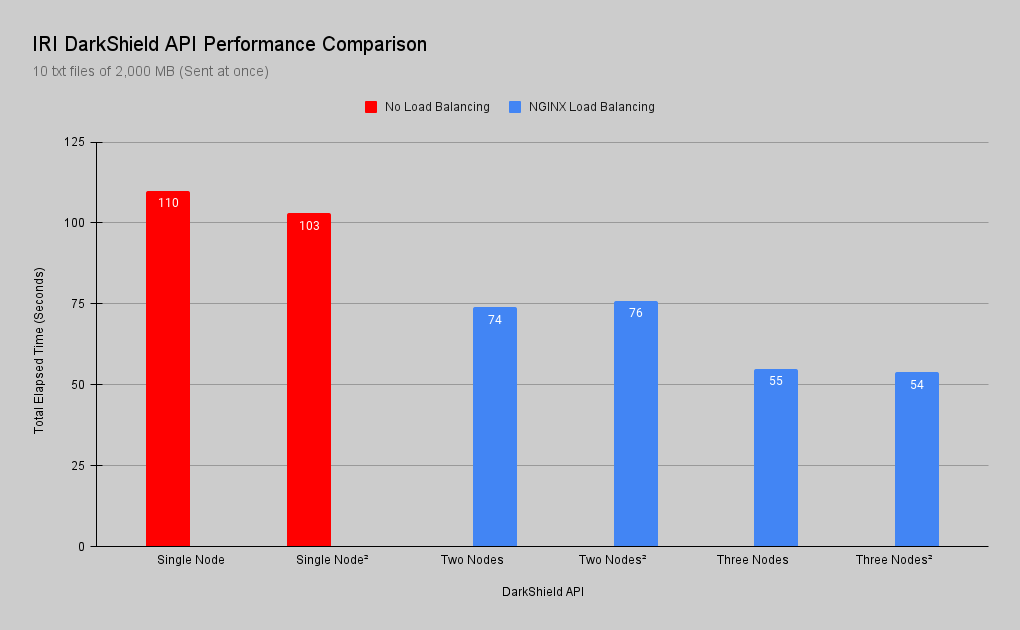
In this next test only 10 2,000-MB text files for a total payload of 2 GB were sent in order to see how a single node performs with a relatively small volume of request that is larger in size.
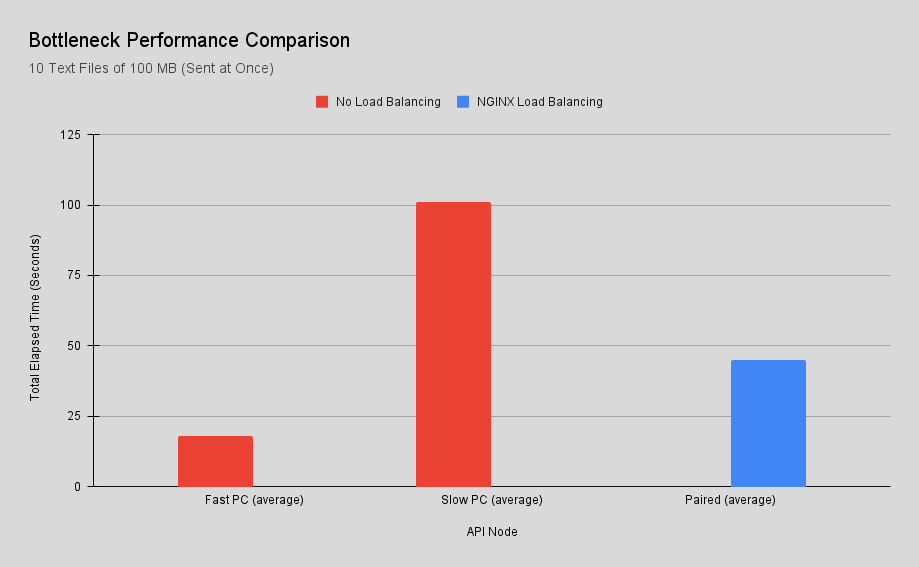
The testing shows that pairing NGINX as a load balancer to DarkShield also improves performance by sharing the workload between all the APIs in the server pool. Load balancing is also beneficial to bottlenecks in the system.
Since the workload is shared, faster servers can help improve the overall performance of the APIs. A quick test was done with the slowest PC that would act as the bottleneck and then it was paired with the fastest PC.
A request of 10 text files the size of 100MB each was sent to the slowest PC. Its average total elapsed time was 1m:40s and once it was paired with the fastest PC it dropped to 43 seconds.
Special Attention
Some specific considerations are needed for load balancing with NGINX due to the way DarkShield works. For DarkShield to know what to look for it needs a search context to be created, which is done by sending a request to the API. The same goes for the mask contexts.
This means using the round robin method of NGINX will cause one DarkShield node to receive the search context, another to receive the mask context, and the next one to receive the actual data that needs to be masked. To get around this issue, you must send the search and mask context to all of the API’s in the server pool, so they can have the context needed to perform search and mask functions.
Next, let’s move onto how user authentication can be configured.
User Authentication
I used an NGINX example of authorization to authenticate users before they can access the DarkShield API for PII searching and masking services.
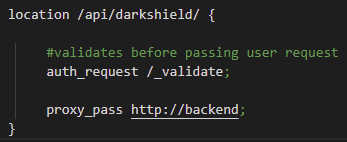
Inside the DarkShield location directive in the backend.conf, there is an auth_request directive that enables authentication based on the results of a subrequest. The subrequest is sent to the /_validate location and checks if the key was sent and if there was a successful match between key and user in the keys.conf file.
Jumping into the keys.conf file, we see the map directive followed by two parameters. The first is the source variable that specifies where to find the apikey, which is in the http header.
The second parameter makes a new variable called api_client_name. Its value depends on the mapping between source and resulting values.
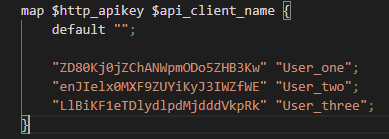
In other words, the map directive grabs the apikey from the http header, creates the variable api_client_name, then it checks to see if there is a grouped pair that has the same key from what was collected from the header. If a match is successful, the variable api_client_name is given the value from the grouped pair.
Once the variables are created, the location /_validate is used to verify that an API key was given. If no key is received in the http header, NGINX sends the client error code 401 (unauthorized).
If a key is given but that key is not associated with a client who does have authorization, then error code 403 (forbidden) is sent to the client. If a key is given that matches an authorized client, the user request is then sent to the API.
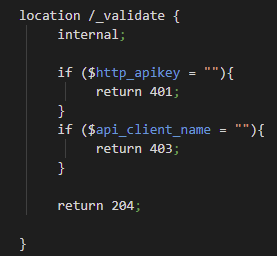
*The include jason_error.cof file at the bottom of backend.conf converts the html errors to a json response.*
You will also see the internal directive, which states that this location can only be accessed by internal requests and not by external requests (which will give a 404 (not found) error). Any errors given inside the validate location are produced by NGINX and not the API. DarkShield will still issue its own errors when it cannot process the user’s request.
NGINX supports other authentication methods like OAuth 2.0 Access Token introspection, but that is outside the scope of this article. Another option is using JSON Web Token authentication, but that only works with NGINX Plus.
Authentication Tests
To show that everything is working as expected, the first test will send the curl request with the correct API key and the following response:

As you can see, the http sends the request to localhost:80 where NGINX is listening. In the header you will see the variable apikey with the key itself and the text that has an email that needs to be masked.
The response with the masked email:
![]()
In the next test, I will send the same curl request but this time with a key that is not in the keys.conf file. The last line in the image is the error message that came from NGINX (not the DarkShield API), telling the client that they are forbidden to use this microservice:

In this test, we will simply send the same curl request but with no apikey in the header. The last line states that it was a 401 (Unauthorized) error:

Finally to ensure that the DarkShield API is still able to handle errors and send its own messages to the client, I will send the same request for a third time. This will send the request to the API on Port 8082 (which does not have the search context created) and respond with an error message from the API.
![]()
Possible Vulnerabilities
As you can see NGINX has several tools that make it very popular and why it is powering one-third of all the websites in the world. With that kind of popularity also comes the attention of malicious users trying to steal sensitive data.
The most vulnerable part is the configuration of NGINX, which can be exploited to gain access to the config files to eventually capture sensitive data. One simple example is missing a slash (/) at the end of the location directive. This error makes it possible to move one step up the file path and gain access to private files.
There are other vulnerabilities that can be taken advantage of, too, but I will link two blog articles that explain common misconfigurations and how to correct them:
Conclusion
Pairing IRI DarkShield API and NGINX can lead to improvement in performance and add another level of security depending on your use case. This pairing can increase performance when dealing with several users needing access to the API, large payloads that need masking and decreasing processing times with bottlenecks.
The way NGINX configures its server pools allows for easy scalability by having one location to add/remove a server. Another benefit is having control over who has access to the API by using authentication before the request is sent to the API.
In general if your goal is to increase performance due to an increase in requests and want to add another layer of security, using NGINX and DarkShield can be the solution you are looking for. If you have any questions about using NGINX with DarkShield to balance workloads or authenticate users, please email darkshield@iri.com.
Directive Definitions:
- Location – sets configuration depending on a request URI
- Can be nested
- Defined by a prefix string or regular expression
- Upstream – defines a group of servers which can listen of different ports
- Proxy_pass – sets the protocol and address of a proxied server and an optional URI to which a location should be mapped
- Ex: proxy_pass http://darkshield;
- Auth_request – enables authorization based on the results of a subrequest and sets the URI to which the subrequest will be sent
- Map – creates a new variable whose value depends on values of one or more of the source variables specified in the first parameter
- Internal – specifies that a given location can only be accessed by internal requests and external requests will be given an error 404
- Client_max_body_size – controls the request size (default is less than 1MB)
- Set to zero to disable checking the request size
- Server_name – sets names of a virtual server
- Proxy_request_buffering
- Enables or Disables buffering of a client request body
- Disable
- The request body is sent to the proxied server immediately as it is received
- Note: request body will be buffered regardless of the directive value unless HTTP/1.1 is enabled for proxying
- Proxy_http_verison
- Default is version 1.0
- Version 1.1 is recommended for use with keepalive
Additional Resources
Bremberg, Kristian, and Alfred Berg. “Common Nginx Misconfigurations That Leave Your Web Server Open to Attack.” Detectify , 10 Nov. 2020, https://blog.detectify.com/2020/11/10/common-nginx-misconfigurations/.
Crilly, Liam. “Deploying Nginx as an API Gateway, Part 1.” NGINX, 20 Jan. 2021, https://www.nginx.com/blog/deploying-nginx-plus-as-an-api-gateway-part-1/#define-top-level.
“HTTP Load Balancing.” NGINX Docs, https://docs.nginx.com/nginx/admin-guide/load-balancer/http-load-balancer/.
“The Most Important Steps to Take to Make an Nginx Server More Secure.” DreamHost , 12 May 2021, https://help.dreamhost.com/hc/en-us/articles/222784068-The-most-important-steps-to-take-to-make-an-Nginx-server-more-secure.
“Nginx Reverse Proxy.” NGINX Docs, https://docs.nginx.com/nginx/admin-guide/web-server/reverse-proxy/.


