Calling the DarkShield V7 API to Mask PII
Quick Summary
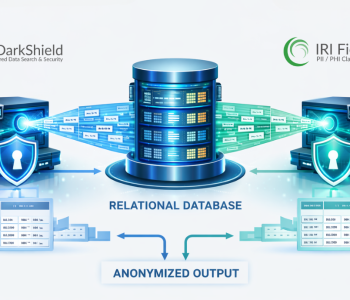
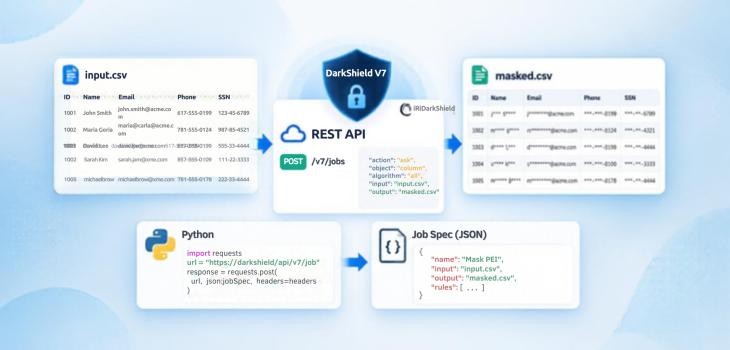
IRI DarkShield is a self-hosted data discovery and de-identification tool that searches for and masks sensitive information in structured, semi-structured, and unstructured data sources, both on-premises and in the cloud. Through its REST API, DarkShield can process source data using predefined search and masking rules. When the data and rules are submitted to the API, DarkShield returns a ZIP archive containing the masked data and associated log files.
This article demonstrates how I created a CSV file search and masking job in the IRI Workbench GUI for DarkShield V7, exported the job specifications for API use, and executed the masking operation from a Python application.
The process covers configuring data classes, exporting search and masking contexts, constructing an API request, and retrieving the masked output.
DarkShield API Call Prerequisites
Before making a DarkShield V7 REST API call, you need four components:
- Original data (in a supported source format)
- Rules (search and masking contexts) file
- DarkShield API server URL
- Header
These components allow the application to send the source data and corresponding masking instructions to the DarkShield server.
Preparing Your Data and Masking Rules
Original Data
Before using DarkShield, identify the source data you want to process.
For this example, I built a Python application that retrieves CSV-formatted data from a public website’s API and sends it to the DarkShield REST API for masking.
Although this demonstration uses a CSV file, DarkShield supports multiple structured, semi-structured, and unstructured file formats for searching and masking sensitive data, whether stored on-premises or in the cloud. See the bottom of this page for more information.
Defining the Search and Masking Rules
After obtaining the source data in a supported format, the next step is to define the rules that DarkShield will use.
There are two ways to prepare these rules:
-
Create the JSON configuration manually. Follow the DarkShield documentation to define the search and masking rules in a JSON file, ensuring that the configuration uses the required structure and syntax.
-
Use the IRI Workbench GUI. Configure a DarkShield file search and masking job through the graphical interface, then export the job specifications for use in an API call.
I chose the second approach because IRI Workbench provides a graphical interface for configuring the search and masking rules without having to write the entire JSON specification manually. After setting up the job, I used the GUI to export the API job specs for use in my Python program.
Configure the DarkShield Job in IRI Workbench
When you are ready to create a DarkShield job to run in the GUI, command line, or from an API call, open IRI Workbench from your Windows or Linux desktop.
From the application’s top-level menu, select New > IRI Project to create a project for your job files.
Defining Your Data Classes
Before launching a DarkShield job configuration wizard, you will want to select out-of-the-box data classes or newly define one or more of your own.
Data classes are reusable, uniquely named definitions for specific types of sensitive information, such as email addresses, last names, Social Security numbers (SSNs), and account numbers. They associate search matchers with masking rules so that DarkShield can identify and process the relevant data.
To review or create data classes:
- Open the Data Class and Rule Library dialog by double-clicking the
.dcrlibfile in your new project folder. - Review the available data classes.
- To create a new data class, click the
 new data class icon.
 - Name the data class and specify the appropriate location and/or data matchers.
For example, I created a data class for latitude values contained in a CSV file column. Because the CSV file includes column headers, I configured a location matcher to identify latitude data based on the column name, latitude.
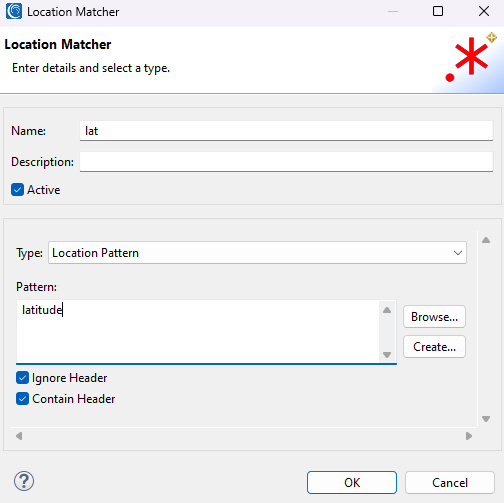
In the Location Matcher dialog, the Ignore Header and Contain Header options were both selected. This configuration tells DarkShield to exclude the header from discovery and masking while retaining it for output formatting.
Repeat this process for each data class you want to use, specifying the appropriate matchers and masking operations.
Building the DarkShield File Search and Masking Job
After defining the required data classes, create the DarkShield job. Locate the DarkShield menu, identified by the black shield icon in the IRI Workbench toolbar. Select “New DarkShield File Search/Masking Job…” to launch the configuration wizard.
Then complete the following steps:
- Select the project folder where the job will be stored.
- Enter a name for the DarkShield job configuration file (
.dsc). - Choose any search report options you want to include. I did not require search reports for this demonstration, so I left those options blank.
- Select the premade data classes.
- Specify the source and target data locations or folders.
- Click Finish to save the initial job specifications in the project folder.
The resulting .dsc file contains the job configuration that can subsequently be exported for API use.
Export the Job Artifacts (API Specs)
Once the job has been configured, return to the DarkShield menu in IRI Workbench and select Export Job Specs for API Use…
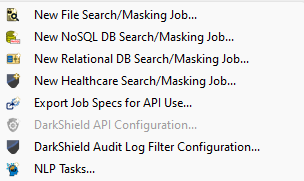
This option exports the configuration information needed to submit the job through the DarkShield REST API.
In the export dialog, select the .dsc job file and specify the target directory where the exported specifications should be saved. I placed the exported files in the same directory as my Python program so the application could access them easily.
The .dsc file identifies the job that was just created, while the target directory determines where the exported API specifications will be written.
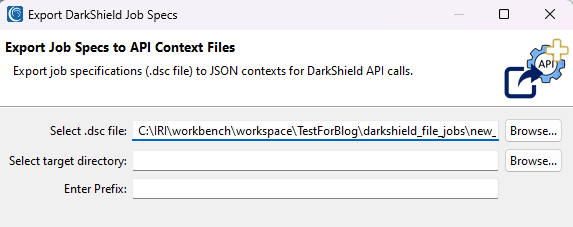
After export, you will see these specification files:
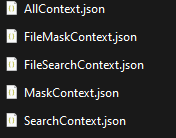
The exported configuration includes the AllContext.json file used in the API call. This file contains the search and masking contexts defined in IRI Workbench.
Making the DarkShield V7 REST API Call
With the source data and exported configuration ready, the next step is to construct the API request. The DarkShield REST API receives the data and search/masking context, processes the specified masking operations, and returns the results in a ZIP archive.
Understanding the cURL Command
The following cURL command represents the base format for making an API call to DarkShield:

The -X POST option specifies the HTTP POST method used to send request data to the endpoint URL and receive a response. In this scenario, DarkShield processes the incoming payload and returns a zipped archive containing the masked data and log files.
The -H flag defines request header parameters, such as the target media type or multipart boundary metadata.
The -F flag specifies the form fields and files sent in the request body. Here, context=@AllContext.json attaches the search and masking rules exported from IRI Workbench. If you are executing the cURL command directly rather than via a script, include the target file to be masked as an additional field parameter.
Get the Base URL for the cURL Command
Before sending a request, identify the URL of the running DarkShield API server.
From IRI Workbench:
- Select Window > Preferences > IRI > DarkShield.
- Click Stop Server if a DarkShield server is already running.
- Click Start Server.
- Select Apply and Close.
Click the console  button on the far right to display the base URL:
 Use the URL shown without the word
 homepage, which appears on the second line in the original example.
Configuring the API Endpoint URL
For this demonstration, the API endpoint is:
http://localhost:8959/api/darkshield/all/allContext.searchAndMask/
This URL identifies the DarkShield server and its search-and-mask endpoint.
The example uses localhost because the DarkShield API server runs locally. If the server is hosted elsewhere, replace localhost with the appropriate server IP address.
Setting the HTTP Header
The request header is derived from the -H option in the cURL command. For my Python application, I used the following header:
header = {
“accept”: “/”,
}
This is the header used in the original demonstration.
The Actual DarkShield API Call Used
The Python application sends the DarkShield server the source CSV file and the exported AllContext.json configuration. I used the variable openn to hold these two files.
The first entry contains the search and masking instructions stored in AllContext.json. The file is opened in binary read mode (rb) and identified as application/json.
The second entry contains the original CSV file, also opened in binary read mode, with the media type text/csv.
The API request is made using Python’s requests.post() method:
openn = {
    'context': (
        'AllContext.json',
        open('AllContext.json', 'rb'),
        'application/json'
    ),
    'file': (
        'testt.csv',
        open('testt.csv', 'rb'),
        'text/csv'
    )
}

response = requests.post(
    url,
    headers=header,
    files=openn,
    stream=True
)
This request sends the server URL, HTTP header, masking configuration, and original CSV data to DarkShield for processing.
What the DarkShield API Returns
A successful DarkShield REST API call returns a ZIP archive containing the processed data and associated log files. The Python application saves the response locally and then opens the archive to access its contents.
For this example, the archive is saved as results.zip, and the masked CSV file is named testt.csvor any included logs directly within Python in read mode (‘r’).
Examining the Original CSV Data and Exported JSON Configuration
The Source: Unmasked CSV File
The original CSV file contains the data retrieved by the Python application.
The dataset includes fields such as service address, ZIP code, county, city, longitude, and latitude. These fields are used to demonstrate how DarkShield applies different masking rules to specific columns.
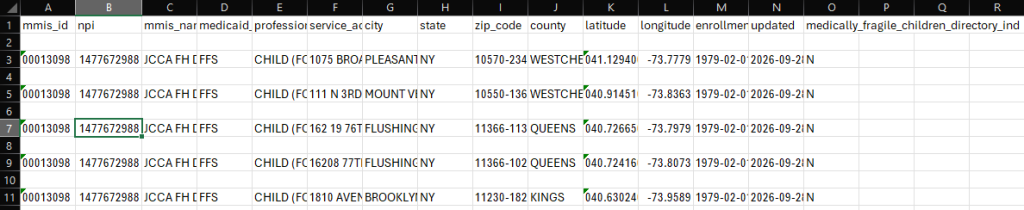
The AllContext.json File
The exported AllContext.json file contains the contexts and rules that DarkShield uses to search for and mask the selected CSV fields.
The following example preserves the configuration from the original demonstration, including the data classes, matchers, masking expressions, and column mappings.
{
  "searchContext": {
    "name": "SearchContext",
    "matchers": []
  },
  "maskContext": {
    "name": "MaskContext",
    "rules": [
      {
        "name": "DataRedactionRule",
        "type": "cosort",
        "expression": "replace_chars(${FIELDNAME},\"*\",1,12)"
      },
      {
        "name": "FPE",
        "type": "cosort",
        "expression": "enc_fp_aes256_alphanum(${FIELDNAME})"
      },
      {
        "name": "DataLengthRule",
        "type": "cosort",
        "expression": "lpp_file(\"file:/C:/Users/relax/Downloads/NYScities.set\")"
      },
      {
        "name": "DataEncryptionRule",
        "type": "cosort",
        "expression": "enc_fp_aes256_alphanum(${FIELDNAME})"
      }
    ],
    "ruleMatchers": [
      {
        "name": "DataLengthRuleMatcher",
        "type": "name",
        "rule": "DataLengthRule",
        "pattern": "City.city"
      },
      {
        "name": "DataRedactionRuleMatcher",
        "type": "name",
        "rule": "DataRedactionRule",
        "pattern": "Address.Address"
      },
      {
        "name": "FPEMatcher",
        "type": "name",
        "rule": "FPE",
        "pattern": "ZipCode.zip|Long.Long|Lat.lat"
      },
      {
        "name": "DataEncryptionRuleMatcher",
        "type": "name",
        "rule": "DataEncryptionRule",
        "pattern": "County.County"
      }
    ]
  },
  "fileSearchContext": {
    "name": "FileSearchContext",
    "matchers": [
      {
        "name": "SearchContext",
        "type": "searchContext"
      },
      {
        "name": "Address.Address",
        "dataClass": "Address",
        "searchMatcherPriority": 1,
        "jdbcTypes": [],
        "type": "column",
        "pattern": "service_address",
        "ignoreHeader": true,
        "containHeader": true
      },
      {
        "name": "ZipCode.zip",
        "dataClass": "ZipCode",
        "searchMatcherPriority": 2,
        "jdbcTypes": [],
        "type": "column",
        "pattern": "zip_code",
        "ignoreHeader": true,
        "containHeader": true
      },
      {
        "name": "Long.Long",
        "dataClass": "Long",
        "searchMatcherPriority": 3,
        "jdbcTypes": [],
        "type": "column",
        "pattern": "longitude",
        "ignoreHeader": true,
        "containHeader": true
      },
      {
        "name": "City.city",
        "dataClass": "City",
        "searchMatcherPriority": 4,
        "jdbcTypes": [],
        "type": "column",
        "pattern": "city",
        "ignoreHeader": true,
        "containHeader": true
      },
      {
        "name": "County.County",
        "dataClass": "County",
        "searchMatcherPriority": 5,
        "jdbcTypes": [],
        "type": "column",
        "pattern": "county",
        "ignoreHeader": true,
        "containHeader": true
      },
      {
        "name": "Lat.lat",
        "dataClass": "Lat",
        "searchMatcherPriority": 6,
        "jdbcTypes": [],
        "type": "column",
        "pattern": "latitude",
        "ignoreHeader": true,
        "containHeader": true
      }
    ],
    "configs": {}
  },
  "fileMaskContext": {
    "name": "FileMaskContext",
    "rules": [
      {
        "name": "MaskContext",
        "type": "maskContext"
      }
    ],
    "configs": {}
  },
  "sourceType": "file",
  "targetType": "nosql"
}
Understanding the AllContext.json Configuration
The exported AllContext.json configuration file defines search matchers for specific CSV columns, such as service address, zip code, longitude, latitude, city, and county, and maps them to defined masking rules.
The rules for masking include character redaction for addresses, format-preserving encryption for geographic coordinates and zip codes, string replacement via set files for city names, and standard encryption for county values.
When passed to the DarkShield REST API with the original dataset, the server processes these search and masking contexts, producing an obfuscated CSV file.
Full Python Application Code for Calling the DarkShield V7 API
The following Python program demonstrates the complete process, from retrieving the source data to calling the DarkShield API and reading the masked output.
First, it connects to the public New York State health data API using the Socrata client. It then retrieves five records, converts them into CSV format, and saves the source file as testt.csv. Next, the application loads the exported AllContext.json file and submits both files to the DarkShield REST API. Finally, it saves the response as results.zip, opens the returned CSV file, and prints its contents.
The code below retains the original application’s implementation and example values.
#!/usr/bin/env python

import csv
import pandas as pd
import requests
import zipfile

from sodapy import Socrata

client = Socrata(
    "health.data.ny.gov",
    "******AppToken*************",
    username="*******@****.com",
    password="****************"
)

data = client.get("keti-qx5t", limit=5)

df = pd.DataFrame.from_records(data)
df = pd.DataFrame.to_csv(
    df,
    sep=',',
    index=False
)

help = open("testt.csv", "w")
help.write(df)
help.close()

url = "http://localhost:8959/api/darkshield/all/allContext.searchAndMask/"

header = {
    "accept": "/",
}

openn = {
    'context': (
        'AllContext.json',
        open('AllContext.json', 'rb'),
        'application/json'
    ),
    'file': (
        'testt.csv',
        open('testt.csv', 'rb'),
        'text/csv'
    )
}

response = requests.post(
    url,
    headers=header,
    files=openn,
    stream=True
)

print(response.status_code)

r = open('results.zip', 'wb')
r.write(response.content)
r.close()

z = zipfile.ZipFile('results.zip', 'r')
file = z.open('testt.csv')
print(file.read())
file.close()
When the program executes, DarkShield processes the retrieved CSV data according to the search and masking rules defined in AllContext.json. The API returns a ZIP archive that includes the masked CSV file and log files.
The following sections show examples of the returned information.
Reviewing the DarkShield API Results
Audit.json
The returned Audit.json file records information about the API request.
In the original demonstration, it includes the requesting user agent, remote IP address, SSL status, content type, source filename, and processing timestamps.
{
  "userAgent": "python-requests/2.34.2",
  "remoteIpAddress": "0:0:0:0:0:0:0:1",
  "isSSL": false,
  "content-type": "text/csv",
  "filename": "testt.csv",
  "startTime": "2026-10-12T18:31:13.555Z",
  "endTime": "2026-10-12T18:31:13.560Z"
}
These fields document the request information and the start and end times recorded for the operation.
Results.json
The Results.json file provides information about the detected data and the masking operation.
In the example shown in the original article, the results identify a county column matcher and the rule applied to the detected value.
The output includes information such as:
- The search matcher name,
County.County - The matcher type,
column - The associated data class,
County - The search matcher priority
- The masked result
- The masking rule name,
enc_fp_aes256_alphanum - The start and end positions associated with the result
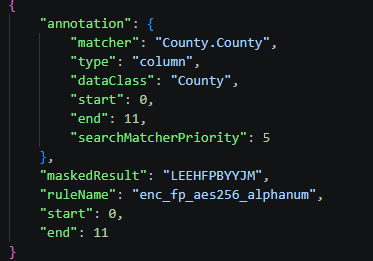
This information illustrates how the returned results identify both the matched data and the masking function applied to it.
The Target: Masked CSV File
The final output is the masked CSV file returned by DarkShield.
In the original example, DarkShield processes the designated address, ZIP code, longitude, latitude, city, and county columns according to the exported configuration. The returned file demonstrates how different masking rules can be applied to selected columns within the same dataset.
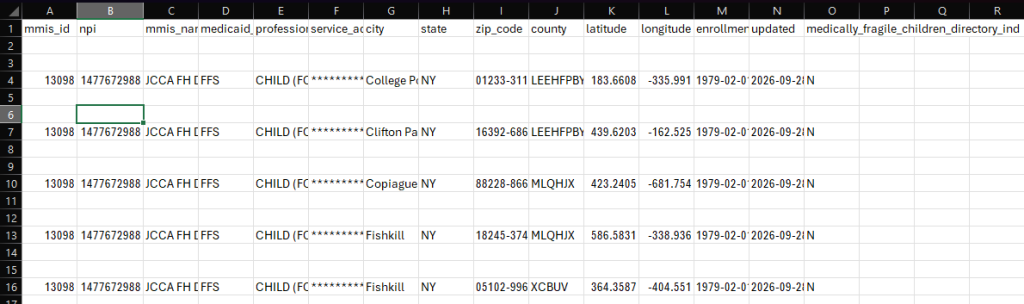
The original unmasked and masked CSV screenshots should remain in the article so readers can compare the source values with the results produced by the DarkShield API call.
Frequently Asked Questions
How do you call the DarkShield V7 REST API to mask sensitive data?
To call the DarkShield V7 REST API, prepare the source data and search/masking configuration, identify the server endpoint, and submit the files using an HTTP POST request. In the Python example, the requests.post() method sends the CSV file and exported AllContext.json configuration to the allContext.searchAndMask endpoint. DarkShield returns a ZIP archive containing the masked data and log files.
Can DarkShield API masking rules be configured without manually writing JSON?
Yes. IRI Workbench allows users to configure DarkShield search and masking jobs through its graphical interface. After defining the data classes, matchers, masking rules, and source/target locations, users can select Export Job Specs for API Use to generate the configuration used by the REST API.
What is the purpose of the AllContext.json file in DarkShield?
The AllContext.json file contains the search and masking contexts exported from IRI Workbench. It specifies how DarkShield identifies selected data and which masking rules to apply. In this example, the configuration maps CSV columns such as service address, ZIP code, longitude, latitude, city, and county to their corresponding masking operations.
What data masking methods are demonstrated in the DarkShield V7 API example?
The article demonstrates character redaction for addresses, format-preserving encryption for ZIP codes and geographic coordinates, string replacement using a set file for city names, and encryption for county values. These operations are defined in the exported JSON configuration and applied through the DarkShield REST API.
What files does the DarkShield REST API return after masking data?
A successful API request returns a ZIP archive containing the masked data and associated log files. In this demonstration, the returned files include the masked CSV output, Audit.json, and Results.json. The Python application saves the archive locally and reads the masked CSV file.
More Information
For further assistance with DarkShield API integration, custom data masking configurations, or licensing inquiries, reach out to IRI via darkshield@iri.com or visit the IRI Contact Page.