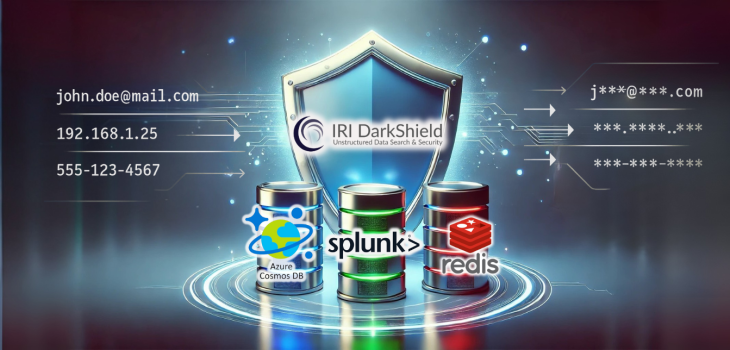
Masking PII in Splunk, Redis & CosmosDB
Editor’s Note
This is the third article in a series of articles on using IRI DarkShield to search and mask sensitive data in NoSQL databases. IRI Workbench GUI for DarkShield currently supports the following NoSQL databases:
- Cassandra
- Elasticsearch
- MongoDB
For detailed instructions on using the DarkShield wizard with these databases and their configuration requirements, refer to this article.
Introduction
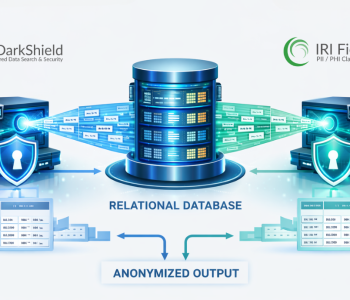
To extend its reach and performance, DarkShield now front-ends support for three additional NoSQL database technologies: Splunk, Redis, and CosmoDB. This article demonstrates how to use the IRI Workbench GUI for DarkShield to discover and mask sensitive data within these platforms.
Overview of Splunk, Redis, and CosmosDB
Splunk is a powerful analytical platform for searching, monitoring, and visualizing machine-generated data. Logs and event data ingested by Splunk often include sensitive information like IP addresses, user IDs, or other identifiers that must be masked before sharing or reporting.
Redis is a high performing and flexible in-memory key-value store commonly used for caching, session management, and real-time analytics. Redis Enterprise builds on Redis Open Source, offering a flexible set of data structures and a rich module ecosystem– not just as a cache, but as a versatile multi-model NoSQL store. As a NoSQL database, Redis may store personally identifiable information (PII) such as user session data, authentication tokens, or personal preferences—data that may require masking to prevent potential leaks.
Azure Cosmos DB for NoSQL is Microsoft Azure’s fully managed NoSQL database solution designed for fast, scalable, and globally distributed applications. It uses a JSON document model and enables users to query and manage data with SQL-like syntax. Due to its role in storing application and user data, CosmosDB often contains PII such as names, emails, and contact information–data that requires protection through masking to prevent unauthorized access or exposure.
Prerequisites
Before launching the DarkShield NoSQL wizard, make sure you’ve completed the following steps:
1. Set the API Directory
Verify that the DarkShield API distribution directory has been specified in IRI Preferences. To do so, go to IRI Workbench Preferences > IRI > DarkShield. From here, you can configure both DarkShield GUI and API preferences, including the host, port, and directory where the DarkShield API resides. This is also where you can start the Darkshield Server.
2. Create a Project with a Library
All DarkShield wizards require a project that includes an IRI Data Class and Rule Library. This library must contain at least one Data Class and a masking Rule assigned to it.
3. Verify Data Access Permissions
The DarkShield API must have read and write access to your NoSQL data silos. Each NoSQL database type uses a different SDK for connectivity and CRUD operations. As a result, connection credentials and configuration details may vary by database.
Using the Wizard
In the DarkShield menu, launch the wizard by selecting New NoSQL DB Search/Masking Job…. This opens the first page, where you’ll give your job a new name.
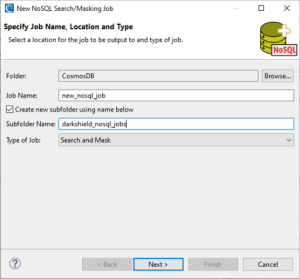
When you’re done, click Next > to define the details of the data you want to find and how it should be masked.
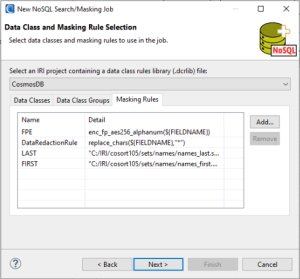
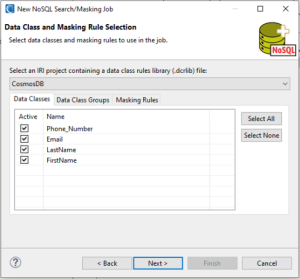
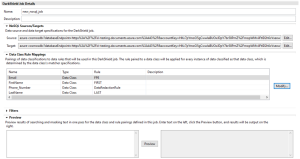
On the Assign Masking Rules to Data Classes page, assign a masking rule to a data class and/ or data class group to define how PII will be masked.

Once finished, click Next > to select the NoSQL silo you want to search and mask.
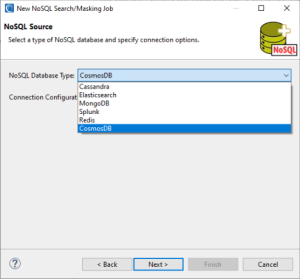
Connection Credentials
With the NoSQL database type selected, the next step is to create a new connection configuration, which gets saved in the connection registry:
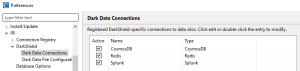
Example of Darkshield connection registry
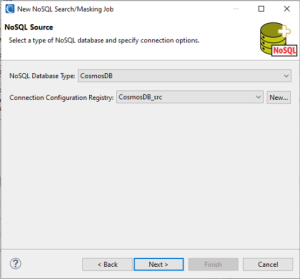
Depending on the database and scope of your search within it, the connection parameters vary:
Splunk Source Definitions
Splunk Index Search
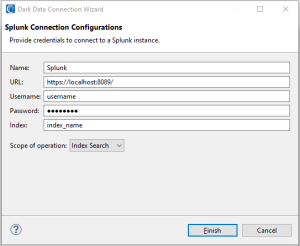
- Name: A user-defined name for the connection configuration
- URL: The Splunk instance URL
- Username & Password: Log-in credentials for user
- Index: The Splunk index to search within
- Scope of operation: An index search will search and mask PII within all contents within the specified index.
Splunk Query Search
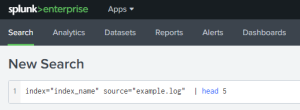
Splunk Web search bar with specified search criteria
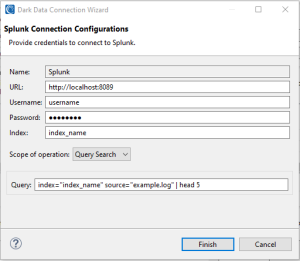
- Name: A user-defined name for the connection configuration
- URL: The Splunk instance URL
- Username & Password: Log-in credentials for user
- Index: The Splunk index to search within
- Scope of operation: A query search will search based on search criteria. An “All time” search will be performed if not specified in the query.
Redis Source Definition

- Name: A user-defined name for the connection configuration
- Host: The hostname or IP address of the Redis server
- Port: The port number on which the Redis server is listening (default is 6379)
- Key Name: The Redis key or key pattern to search within
- Username & Password: This setting is optional, depending on how your security is set up.
CosmosDB Source Definitions
CosmosDB Database Search
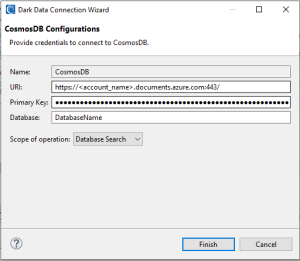
- Name: A user-defined name for the connection configuration
- URI: The URI of CosmosDB instance.
- Primary Key: The primary key for a CosmosDB connection
- Database: The database to search within
- Scope of operation: A database search will search and mask PII within all contents within the specified database.
CosmosDB Container Search
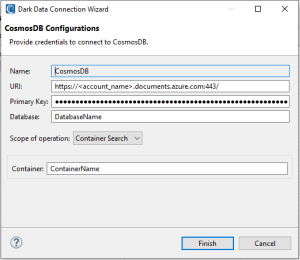
- Name: A user-defined name for the connection configuration
- URI: The URI of CosmosDB instance
- Primary Key: Primary key for CosmosDB connection
- Database: The database to search within
- Scope of operation: A container search will search and mask PII within all contents within the specified container.
Target Definition
The NoSQL target page defines where the masked data will be written. Similar to the Data Source page, it uses a connection registry to select the NoSQL data silo and supply the necessary credentials.
To create a new connection configuration for a target, click New…
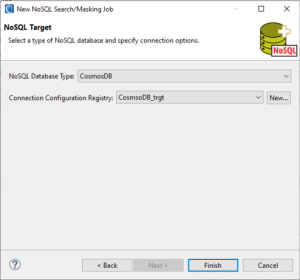
Creating a connection configuration for a data target follows the same steps as creating a data source.
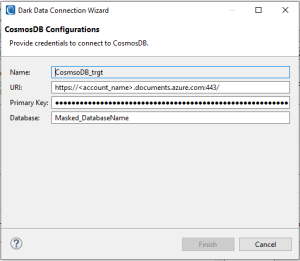
Example of a CosmosDB target connection registry
In the example above, a new database was named, and because of that, it will be automatically created to receive masked data.
Once you configure the target silo for the masked data, click Finish to add it to the connection registry.
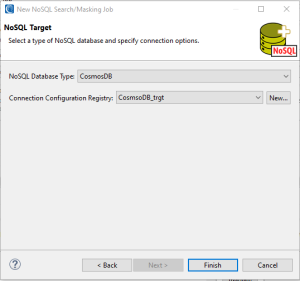
Alternatively, you can click Finish to use the same configurations as the source. But note that if you just re-use the source configuration in the target, your original source data will be overwritten.
Review & Run the Job
After a NoSQL target has been selected, click Finish to generate the DarkShield configuration (.dsc) file that the DarkShield API will use at runtime. Job details appear in, and can be edited in the IRI Workbench dialog like this:
The IRI DarkShield Configuration (.dsc) file for a CosmosDB search and mask job
If you make any changes in the editing window above, be sure to save the job before you run it.
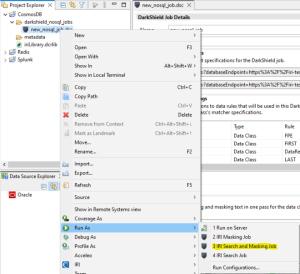
To run a DarkShield Search and Mask Job right, click the .dsc file and select IRI > Run Search and Masking Job.
Once the Search and Masking Job is completed, any PII data identified will be masked and written to the target silo you specified earlier.
Below are examples showing the original unmasked data, followed by the masked result:
Splunk Data Masking Example
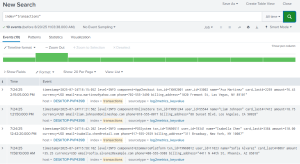
Splunk index unprotected
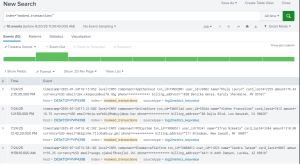
Splunk index protected
Redis Data Masking Example
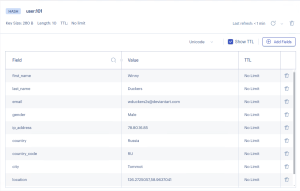
Redis hash unprotected
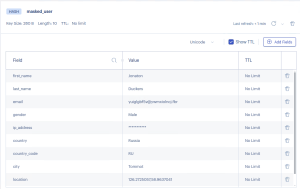
Redis hash protected
CosmosDB Data Masking Example
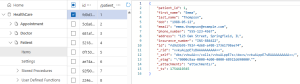
CosmosDB item unprotected
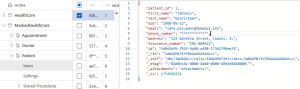
CosmosDB item protected
In each case, as with any DarkShield (or FieldShield) data classification and masking operation, the masking rule once assigned to that data class will apply consistently amongst all defined structured, semi-structured (as in this case), and unstructured sources. And when the masking rule is a deterministic masking function like format-preserving encryption, you can preserve referential integrity (masked value consistency) in every enterprise target.
If you would like more information about, or assistance with, discovering or de-identifying PII or other sensitive data in your on-premise or cloud sources, please email darkshield@iri.com.